Learn how to turn on captions can make it easier to follow along with videos, meetings, or any audio on your device.
You can enable live captions directly through your device’s settings or by using a simple keyboard shortcut, which instantly shows text for all spoken audio.
This feature is especially useful if you’re in a noisy environment, have hearing difficulties, or prefer reading over listening.
Live transcription also helps by automatically capturing spoken words in real time.
You can usually find the option to turn on captions or transcription in accessibility or audio settings, depending on the app or system you’re using.
Knowing how to activate these features lets you access clearer communication whenever you need it.
Enabling Live Captions and Transcription
You can turn on live captions and automatic transcription in Windows using different methods. Each way lets you quickly access captions that show spoken words as text on your screen. You can use the Settings app, Quick Settings menu, or a keyboard shortcut for fast toggling.
Using the Settings App
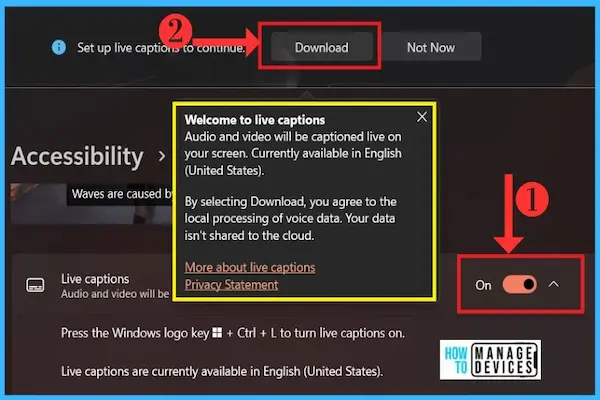
To enable live captions through the Settings app, open Settings from the Start menu or press Windows key + I. Then go to Accessibility and select Captions. Here, toggle on Live captions.
This activates automatic transcription for any audio playing on your device. You can also adjust how captions appear, such as text size, color, and background, all within the same menu.
Using the Settings app is useful if you want to customize the captions or enable them permanently for your account. It gives you full control over the features and appearance.
Activating from Quick Settings
You can also turn on live captions through Quick Settings to save time. Click the battery, network, or volume icon in the lower right corner of the taskbar to open Quick Settings.
Look for the Live captions toggle, then turn it on. If you don’t see it, you may need to add it by selecting Edit quick settings and dragging Live captions into the visible icons.
This method is helpful when you want to enable live captions temporarily or during specific activities without going through multiple menus.
Keyboard Shortcuts for Quick Access
For the fastest way to enable or disable live captions, use the keyboard shortcut Windows key + Ctrl + L. Pressing these keys together will turn live captions on or off instantly.
This shortcut works system-wide and starts automatic transcription immediately on your active audio content. It’s ideal for quick access during meetings, videos, or conversations when you need captions fast.
Using this shortcut means you don’t have to pause your work or open menus, making live captions easy to manage at any moment.
Customizing Caption Display
You can adjust how captions appear on your screen to match your needs for comfort and clarity. This includes changing text size and style, moving the captions window to a better spot, and selecting colors that improve readability without distracting you from other content.
Changing Caption Style and Size
You have control over the font type, size, and style of the live captions. To change these settings, open the captions window and select the settings icon. From there, choose Caption style.
You can pick from built-in styles or create a custom style that suits your preferences. Increasing the font size helps make captions easier to read, especially during long sessions.
Using the default style adapts to your system’s light or dark mode automatically. Custom styles allow you to select bold or italic fonts and adjust letter spacing to improve legibility.
Adjusting Caption Window Position
The captions window can be placed in different areas on your screen. You can dock it either above or below the main display without blocking other apps. This reserved space keeps captions visible but unobtrusive.
Alternatively, you can choose to have the captions floating on screen in an overlay window. This lets you drag and move the captions anywhere, avoiding important content.
Choose the location based on your setup and what you’re watching or doing. For example, docking at the top works well for video calls, while the bottom may be better for movies.
Personalizing Color and Background
Customize the text color, background color, and transparency to fit your viewing environment. Light text on a dark background or vice versa can reduce eye strain.
You can adjust background transparency so captions blend in more or stand out clearly. This is helpful when you have busy video content or multiple open apps.
In the settings, you can also change the outline and highlight colors of captions. These options make the captions easier to see against complex backgrounds while keeping your screen readable.
Accessibility Benefits and Use Cases
Turning on live captions and transcription can improve how you interact with audio content in many ways. You can better follow conversations, understand different languages, and stay focused even in noisy places. These features help make digital content more usable and inclusive.
Enhancing Accessibility for All Users
Live captions are a key accessibility feature that helps people who are deaf or hard of hearing. By showing spoken words as text on your screen, you won’t miss important information during meetings, videos, or calls.
This feature also benefits users who struggle with processing speech or have attention difficulties. The captions provide a visual backup that supports better comprehension.
Importantly, live captions work on your device without sending audio to the cloud, protecting your privacy. You can personalize captions to fit your needs, such as changing font size or color to improve readability.
Multitasking and Noisy Environments
If you often multitask, live captions allow you to follow audio even when you can’t listen closely. For example, you can read captions while working on other tasks without having to pause videos or calls.
In noisy environments, captions help you catch every word without turning up the volume. This can be useful in busy offices, public places, or homes with background noise.
You can also choose where captions appear—above, below, or floating on your screen—so they do not block other content you are working with.
Language Support and Translation
Live captions support multiple languages, so you can read transcriptions in many spoken languages like English, Spanish, Chinese, and more. On compatible devices, you can also get real-time translations between languages.
This helps you understand content in foreign languages during presentations or meetings. You can add or change languages easily by downloading language packs on your device.
With live captions and translation, you reduce language barriers and improve communication in global or multicultural settings. This makes audio content more accessible to you and others.
Managing Live Captions on Different Windows Versions
You need to know which versions of Windows support live captions and how to access them. Features and availability differ between Windows 11 and Windows 10. This affects how easily you can use live captions and what options you have for customization.
Live Captions on Windows 11
Windows 11 offers built-in live captions starting with version 22H2. You can turn live captions on through Settings > Accessibility > Captions or quickly with the shortcut Windows key + Ctrl + L.
Live captions work entirely on your device, meaning your audio and captions stay private. On Windows 11, live captions can show text for any audio playing on your PC, including videos and calls.
If you have a Copilot+ PC, live captions can also translate from over 40 languages into English or Chinese. You can customize caption appearance, position, and filter profanity through settings. The feature works even offline once language files are downloaded.
Availability on Windows 10
Live captions are not a built-in feature on Windows 10. Microsoft introduced this feature starting with Windows 11, so Windows 10 does not support automatic live captions natively.
If you want captions on Windows 10, you may need to use third-party apps or services designed for transcription and captioning. These apps work separately since Windows 10 doesn’t include a system-wide caption feature like Windows 11.
Keep in mind that third-party solutions may require internet access and might not offer the same level of privacy or customization as Windows 11 live captions.
Tips, Limitations, and Advanced Settings
You can adjust captions and live transcription through your device’s settings to improve your experience. Knowing how to fix common issues, disable captions when needed, and customize how captions appear will help you use these features effectively.
Troubleshooting Common Issues
If captions don’t appear, first check that Live Captions is turned on in the Settings app. Go to Settings > Accessibility > Captions and ensure the toggle is enabled. Also, verify your default audio output device in Settings > System > Sound, as captions rely on audio playback.
Delays or missed captions may occur if your device is running heavy apps. Closing unused programs can improve caption responsiveness. Background noise may reduce microphone caption accuracy; try reducing noise or speaking clearly into your mic if using that feature.
If captions stop unexpectedly, restarting your device or toggling captions off and back on often resolves the issue.
Disabling or Ending Captions
You can turn off live captions quickly from Quick Settings by pressing Windows + A, then selecting Accessibility > Live Captions to toggle it off.
Alternatively, press the shortcut Windows logo key + Ctrl + L to enable or disable captions instantly.
If captions were enabled from the Settings app, you can return there to switch the feature off under Accessibility > Captions.
When you disable captions, any temporary downloads for language files remain unless manually removed through the Installed Apps list in the Settings app.
Advanced Customization Options
You can personalize captions for better readability. In the live captions window, select Settings > Caption style to pick from built-in styles or create your own. You can change font size, color, and background to suit your preference.
Choose where captions appear on your screen: docked above or below, or floating over apps. Docked captions reserve screen space without blocking your content, while floating captions can be repositioned freely.
You can also enable microphone audio captioning to transcribe your own speech by turning on Include microphone audio in Preferences. This is off by default to prioritize other audio.
Use the Filter profanity option to mask inappropriate words in captions. To add languages, go to Change language in settings, download needed language packs, and select them as preferred caption languages.